JIDE Desktop Application Framework - Tutorials
Introduction
Welcome to the the JIDE Desktop Application Framework (JDAF) Tutorial page! This page is intended to show the basics of using JDAF. Download the
full evaluation copy of the JDAF product and dig into the comprehensive Developers Guide and JavaDoc for a greater understanding of this material. The source for these tutorials are included in the evaluation copy. Also, try out the
JDAF Application Wizard, which is a code generation wizard that will frame-out a JDAF application for you.
Abstract
Making a small frame-based Swing application is fairly straightforward. Most developers are comfortable with classes like JFrame and the normal palette of Swing Components. You may even be familiar with our JIDE family of Swing Components. However, things start to get out of hand quickly when an application gets larger. For example, introducing the concept of multiple documents starts one down a path of requirements such as data management, menu wiring, dialog negotiations, and window management. This behavior is expected by users but has little to do with core application functionality, yet it takes a significant amount of time and resources to accomplish. Compound this with the challenges of cross-platform deployment such as OS Guidelines integration and varying Java VM versions and implementations and you suddenly have a non-trivial venture.
The goal of the JDAF was to solve these real-world problems. With a Model-View-Controller (MVC) architecture and our ground-breaking
Managed Application UI technology, you can focus on your core application functionality and not get mired in the escalade of details required to implement a non-trivial application.
The following examples are intended to illustrate how easy it is to start creating a robust, fully-featured application in Java using the JIDE Desktop Application Framework, while explaining the fundamentals of using it.
Overview
The use of JDAF centers around the
DesktopApplication class. JDAF supports two types of applications through the subclasses
GUIApplication and
ConsoleApplication. You may either subclass these or use them as instances. In these examples, we will always use the instance as opposed to subclassing for sake of illustration, if for no other reason.
The following examples are intended to provide a brief introduction to using the JDAF to create GUI applications.
Tutorial 1: HelloGUIWorld.java
Let's start with a "Hello World" example. JDAF is a MVC architecture. DesktopApplication is the
Controller. For GUI applications we use the subclass
GUIApplication. So, the first thing to do is instantiate a GUIApplication:
GUIApplication application = new GUIApplication("HelloGUIWorld");
Next we need to provide a Model for our application. This is facilitated by the
DataModel interface.
DataModel facilitates the lifecycle of data in an application. JDAF provides a basic implementation with the
BasicDataModel. This class has a
data property to store your user data. For our example, the String "Hello World!" is our data.
public class MyModel extends BasicDataModel {
	public void newData() {
		setData("Hello World!");
	}
}
Here, we have implemented
new behavior, since this is the only requirement. You may implement other methods such as
openData(), saveData(), resetData() and
closeData(). The GUIApplication is pre-wired to call these methods as appropriate from the UI. You may additionally register a
DataModelListener with the GUIApplication to monitor all
DataModel lifecycles.
In a real-world application, models needs to be generated on demand, say from a menu or at application startup. There may even be different kinds of models as well. JDAF facilitates this with the
DataModelFactory class. It is necessary to set one or more of these in the
GUIApplication to tell it how to create a
DataModel in response to input criteria. JDAF provides some
DataModelFactory implementations for immediate productivity. For this example we'll use the
BasicDataModelFactory which allows us to vend a DataModel using its Class alone.
application.addDataModelFactory(new BasicDataModelFactory(MyModel.class));
Next we need to provide a
View for our model. JDAF automatically manages the model-view relationship in your application, which in a GUI application means managing the windowing architecture, so all you need to do is supply the content for the view. This is facilitated by the
DataView interface. JDAF provides a default implementation for a GUIApplication called
DataViewPanel. This Component is based off JPanel and provides some strategy methods.
public class MyView extends DataViewPane {
	JLabel label;
	protected void initializeComponents() {
		label = new JLabel();
		label.setFont(new Font("serif", Font.PLAIN, 24));
		add(label, BorderLayout.CENTER);
	}
	public void updateView(DataModel dataModel) throws DataModelException {
		label.setText((String)dataModel.getData());
	}
}
The initializeComponents() method is where we create components. The
updateView() method is called to cause the view to reflect the model. (There is a corresponding
updateModel(), but that is inapplicable here.) Notice how we pass our data into the view. The
DataModel.getData() will return our "Hello World!" value and place it in the JLabel.
As previously discussed, the
GUIApplication is responsible for generating models and views. A corresponding
DataView should be generated for each DataModel. This is accomplished using a
DataViewFactory. We will add a BasicDataViewFactory which allows us to vend our
DataView by Class.
application.addDataViewFactory(new BasicDataViewFactory(MyView.class));
You may register a DataViewListener with the GUIApplication to monitor all
DataView lifecycles. The
GUIApplication is now configured. The last thing to do is run it! This is accomplished with a call to the
run() method.
Here is the entire HelloGUIWorld application:
public class HelloGUIWorld {

    public static void main(String[] args) {
        GUIApplication application = new GUIApplication("HelloGUIWorld");
        application.addDataModelFactory(new BasicDataModelFactory(MyModel.class));
        application.addDataViewFactory(new BasicDataViewFactory(MyView.class));
        application.run(args);
    }

    public static class MyData extends BasicDataModel {
	   public void newData() {
		   setData("Hello World!");
	   }
    }

    public static class MyView extends DataViewPane {
        JLabel label;
        protected void initializeComponents() {
            label = new JLabel();
            label.setFont(new Font("serif", Font.PLAIN, 24));
            add(label, BorderLayout.CENTER);
        }

        public void updateView(DataModel dataModel) throws DataModelException {
            label.setText((String)dataModel.getData());
        }
    }
}
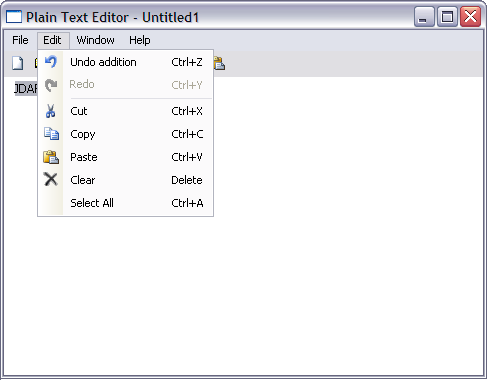
Here is the result on various platforms:
What's this? Menus, Toolbars? Yes, and they are fully operational! This is the result of the
Managed Application UI technology. Out of the gate your application has a significant amount of functionality. Notice the differences in window titling, icon themes, and menu and toolbar configurations. This GUI will configure differently based on where it is run, while retaining equivalent functionality. Each configuration is based on OS Guidelines and case studies. (See the screen shots
here to see the difference in menu configurations.) This application will satisfy OS Guidelines on each platform, which means that the end user has a seemless experience on their platform with your Java application. Talk about
extreme GUI programming!
Tutorial 2: PlainTextEditor.java
Let's do something a little more substantial. We'll create a plain text editor. The point is to illustrate the most common manifestation of a real-world desktop application; the
Document-Centric or
File-Based Application. With this example we'll illustrate a usability subclass of
GUIApplication called the
FileBasedApplication. This application will read and write text files.
The first thing we do is create the application instance, similar to the way we created a GUIApplication in the previous example:
FileBasedApplication application = new FileBasedApplication("Plain Text Editor");
FileBasedApplication manages your models for you by managing the loading and saving of data to/from files using a
FileDataModelFactory and FileDataModel. FileDataModel is similar to
BasicDataModel in that it maintains data in the
data property, accept the data in this case is sourced from a File. More on this later.
Let's define our view for the text. Since this is plain text, we'll make a
DataView using a common Swing Component; JTextArea.
public static class TextView extends DataViewPane {
   private JTextArea textArea;
   private DocumentListener docListener;
   protected void initializeComponents() {

       // sets the window size
        setPreferredSize(new Dimension(550, 400));
        setBackground(Color.WHITE);
        setBorder(null);

        // init text area
        textArea = new JTextArea();
        textArea.setFont(textArea.getFont().deriveFont(12f));
        textArea.setWrapStyleWord(true);
        textArea.setLineWrap(true);
        docListener = new DocumentListener() {
           public void insertUpdate(DocumentEvent e) {
              makeDirty(true);
           }
           public void removeUpdate(DocumentEvent e) {
              makeDirty(true);
           }
           public void changedUpdate(DocumentEvent e) {
              // unnecessary for plain text
           }
        };
        textArea.getDocument().addDocumentListener(docListener);
        textArea.setBorder(BorderFactory.createEmptyBorder(4,10,4,4));
        JScrollPane scrollPane = new JScrollPane(textArea);
        scrollPane.setBorder(null);
        scrollPane.setOpaque(false);
        add(scrollPane);

        // install editing features
        EditUtils.installEditTooling(getApplication(), textArea);
    }

    public void updateView(DataModel dataModel) {
       FileDataModel fileDataModel = (FileDataModel)dataModel;
       textArea.getDocument().removeDocumentListener(docListener);
       textArea.setText(fileDataModel.getData() != null ? fileDataModel.getData().toString() : "");
       textArea.setCaretPosition(0);
       textArea.getDocument().addDocumentListener(docListener);
    }

    public void updateModel(DataModel dataModel) {
       FileDataModel fileDataModel = (FileDataModel)dataModel;
       fileDataModel.setData(textArea.getText());
    }
}
In the initializeComponents() method we basically create the JTextArea and place it in a
JScrollPane. Since the view size is indeterminate, we set it with
setPreferredSize() explicitly. The managed UI will obey this setting when hosting the view. A few lines of code require explaination. The
DocumentListener is used to dirty the
DataModel when content changes. This flags the application that the model has changed and is a candidate for saving. The code
EditUtils.installEditTooling(getApplication(), textArea) is used to integrate our text component into the
Edit menu. See the Developer's Guide for more details. Notice in updateView() and
updateModel() we simply pass back and forth the text data.
As mentioned previously, FileBasedApplication manages models automatically. Models will be of the type
FileDataModel. This class contains two important members; File and
FileFormat. With FileBasedApplication, to support a given type of data you provide a
FileFormat, to read and/or write the data, and a
DataView, to display and/or edit the data. We've just created a
DataView to handle text, all we need then is a
FileFormat to read and write the text. The JDAF provides some basic
FileFormat classes, and creating new ones is trivial provided you can work with the file format. One
FileFormat we supply is
TextFileFormat. Here is the code to tell the application that its supports text files and should use our
TextView to view them.
application.addFileMapping(new TextFileFormat("txt", "Text"), TextView.class);
That's it. You can add as many
FileFormat/DataView combinations as you like. The application UI will adapt appropriately. See the Developers Guide for more details.
Finally, we run the application.
Here is the entire Plain Text Editor application:
public class PlainTextEditor {

    public static void main(String[] args) {
      FileBasedApplication application =
                  new FileBasedApplication("Plain Text Editor");
      application.addFileMapping(
                  new TextFileFormat("txt"), TextView.class);
      application.run(args);
    }

    public static class TextView extends DataViewPane {
       private JTextArea textArea;
       private DocumentListener docListener;
       protected void initializeComponents() {

          // sets the window size
           setPreferredSize(new Dimension(550, 400));
           setBackground(Color.WHITE);
           setBorder(null);

           // init text area
           textArea = new JTextArea();
           textArea.setFont(textArea.getFont().deriveFont(12f));
           textArea.setWrapStyleWord(true);
           textArea.setLineWrap(true);
           docListener = new DocumentListener() {
              public void insertUpdate(DocumentEvent e) {
                 makeDirty(true);
              }
              public void removeUpdate(DocumentEvent e) {
                 makeDirty(true);
              }
              public void changedUpdate(DocumentEvent e) {
                 // unnecessary for plain text
              }
           };
           textArea.getDocument().addDocumentListener(docListener);
           textArea.setBorder(BorderFactory.createEmptyBorder(4,10,4,4));
           JScrollPane scrollPane = new JScrollPane(textArea);
           scrollPane.setBorder(null);
           scrollPane.setOpaque(false);
           add(scrollPane);

           // install editing features
           EditUtils.installEditTooling(getApplication(), textArea);
       }

       public void updateView(DataModel dataModel) {
          FileDataModel fileDataModel = (FileDataModel)dataModel;
          textArea.getDocument().removeDocumentListener(docListener);
          textArea.setText(fileDataModel.getData() != null ? fileDataModel.getData().toString() : "");
          textArea.setCaretPosition(0);
          textArea.getDocument().addDocumentListener(docListener);
       }

       public void updateModel(DataModel dataModel) {
          FileDataModel fileDataModel = (FileDataModel)dataModel;
          fileDataModel.setData(textArea.getText());
       }
   }
}
Here is a screenshot:
|
|
|
(Using the "Java Cross Platform" Application UI) |
If you run this application you will experience fully-featured document behavior, including open and save dialogs, various standard dialogs such as save alerts, file replace and about 18 other file-related validations. On various platforms you may experience a summary save alert on Mac OS X and Linux/Gnome, if more that one document is dirty. On Gnome you'll see the document age in various file dialogs. You may experience other effects on some platforms like visual queues when a document is dirty, either in the title or the window decorations. If you can experience the application on various platforms note the differences in document titling semantics as well.
Swing Look and Feel and JDAF
This is a good time to discuss the relationship between Swing Look and Feel and the JDAF Managed Application UI. One of the goals of JDAF is to facilitate the best possible cross-platform OS integration. This is accomplished using the combined effects of the
System Default Swing Look and Feels and our Managed Application UI. In other words, these two technologies work collectively to facilitate a high-degree of believability on a given platform. Be aware that changing the Look and Feel alone will not change the behavior of the Application UI, which follows OS Guidelines. So we recommend that on platforms where the System look and feel is appropriate, go with it.
However, there are always exceptions. For example, in the event that JDAF does not support a given OS/platform, the Java Cross-Platform Application UI is used, which conforms to the Sun Java Look and Feel Guidelines and hence uses the Metal Look and Feel. Changing the Look And Feel here may be acceptable, but keep in mind that the Sun Java Look And Feel Guidelines concerning application behavior will still be enforced.
In the event that your project requires a consistent Look And Feel on all platforms, you can set the "usecp" System property to "true", then all platforms will use this Cross Platform Application UI.
Another clear example is Windows XP, where one encounters varying application UIs, even within Microsofts own product lines. (In the Vista Guidelines, Microsoft is encouraging more consistency). If you are familiar with JIDE products then you are aware of the many Look and Feels available for Windows OS. These Look and Feels give your application that polished look on Windows XP.
If you desire to change the look and feel, let's discuss the proper way to do so in JDAF. When
GUIApplication.run() is called, ultimately the managed UI will startup, which will set the Look and Feel. On Windows, JDAF installs VSNET and modern XP icons by default if in XP mode. If using Classic mode, the normal Look and Feel is used with Classic icons. If you set the Look and Feel before a call to
run(), JDAF will override your settings because of the managed UI. So first we must turn off this behavior in the GUIApplication. This is done in the
ApplicationUIManager, which implements the UI of the GUIApplication, like so:
application.getApplicationUIManager().setLookAndFeel(false);
Note: This setting is turned off if you define the "swing.defaultlaf" System property. Again, we do not recommend doing this unless you are branding your application to look the same on all platforms. In which case you should also pass the option "usecp". This will force the Cross Platform Application UI to be used on all platforms.
Now we can set a special Look and Feel on Windows:
LookAndFeelFactory.setDefaultStyle(LookAndFeelFactory.XERTO_STYLE);
LookAndFeelFactory.installDefaultLookAndFeelAndExtension();
Another decision the managed UI makes is whether icons should appear in the menus or not. So let's make this setting to:
application.getApplicationUIManager().getMenuBarsUI().setShowIcons(true);
Here are the changes to the main() method from our previous example:
public static void main(String[] args) {
    FileBasedApplication application = new FileBasedApplication("Plain Text Editor");
    application.addFileMapping(new TextFileFormat("txt"), TextView.class);
    if(SystemInfo.isWindows() && XPUtils.isXPStyleOn()) {
	    application.getApplicationUIManager().setSetsLookAndFeel(false);
	    application.getApplicationUIManager().getMenuBarsUI().setShowIcons(true);
	    LookAndFeelFactory.setDefaultStyle(LookAndFeelFactory.XERTO_STYLE);
	    LookAndFeelFactory.installDefaultLookAndFeelAndExtension();
    }
    application.run(args);
}
Here are the results on Windows XP:
Next Steps
Now that you have been exposed to the power of the Managed UI, we hope you can appreciate the value that it will add to your projects, not only in time, but in the success of your cross-platform application. The next steps are up to you, your requirements and imagination.
These examples introduced you to working with the JIDE Desktop Application Framework to create GUI Applicatons. We have only scratched the surface of the JDAF capabilities. For example, JDAF supports clean integration with our other framework products such as the JIDE Docking Framework and JIDE Action Framework.
To point you in the right direction, in the JDAF, the primary means of providing application-specific behavior to
GUIApplication is by attaching various listeners, customizers, Actions, factories and other objects to your DesktopApplication instance. This encourages a method of application development that produces quality, reusable, and maintainable codebases. Following is a list of classes you may wish to explore:
| Class/Interface |
Description |
| ApplicationLifecycleListener |
Listen to the application lifecycle |
| DataModelListener |
Listen to the data lifecycle |
| DataViewListener |
Listen to the view lifecycle |
| DialogListener |
Listen to dialog activity |
| MenuBarCustomizer |
Customize standard menus and create your application menus |
| ToolBarCustomizer |
Customize standard toolbars and create your application toolbars |
| WindowCustomizer |
Customize windows on open and close |
| DataModelFactory |
Create data in response to application requests |
| DataViewFactory |
Create views in response to application requests |
| PrintSource |
Provide a Pageable instance for printing in response to application requests |
| HelpSource |
Invoke your help system in response to application requests |
| ApplicationFeature |
A super-adapter made up of JDAF listeners and customizers that can be added to a GUIApplication to create reusable cross-cutting functionality |
| Resources |
Read and convert resource bundle values, bind resources to objects |
Tutorial 3: ImageViewFeature.java
Jumping ahead to a more advanced topic of ApplicationFeatures, we put this class together called
ImageViewFeature. It will embue the
PlainTextEditor application with the ability to open jpeg, gif, png, and bitmap images. It also installs a image preview (where supported) into the open file dialog. Simply add this line of code to the example class before calling
run(args).
application.addApplicationFeature(new ImageViewFeature());

This is a good example of mixing DataModel/DataViews. We leave this class to explore on your own.
Example 4: HelloConsoleWorld.java
JDAF is equally capable of creating Console applications. Console applications, or command-line applications, remain relevant due to their ability to provide functionality without the overhead of UI development. In fact, on many platforms, GUI applications are actually front-ends to the "command-line" versions.
Using JDAF to create console applications gives you the benefits of a MVC architecture and an object-oriented API that facilitates the command-driven nature of console applications much better than large
switch or
if statements necessary by handle-written ones. You also get built-in file-handling, printing, and help system commands, so you can get right down to the required functionality.
A command-line application in JDAF centers around the
ConsoleApplication class. Creating our "Hello World" then starts with creating this object:
ConsoleApplication application = new ConsoleApplication("Hello World!");
Let's just run it and see what we get.
application.run(args);
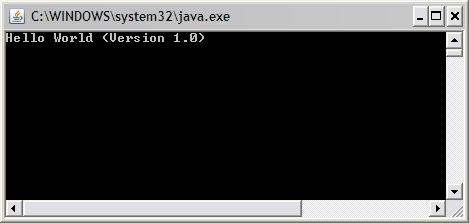
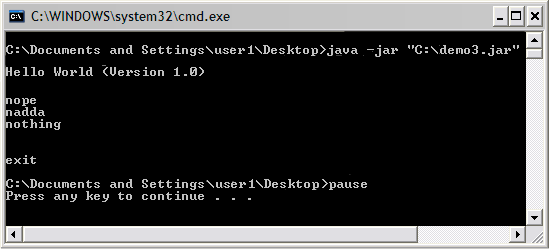
Here we took advantage of the fact that by default
ConsoleApplication announces the name and version of the application on startup. Also notice that we are on a new line, ready to take the next command. For example, to quit this application we type "exit".
ConsoleApplication is command-driven. Commands are facilitated by the
ConsoleCommand class. By typing "exit" and hitting enter, the
ExitCommand was located and executed to terminate the program.
Likewise, every command typed into the console will attempt to be matched with a
ConsoleCommand object and executed. If a command cannot be found, the
IdleCommand is executed. The
IdleCommand has no prompt, so will simply look like a new line in the console. But it actually takes the last console input and attempts to find a
ConsoleCommand to recover the program flow. Below, we typed a few new lines and nonsense commands, but where finally able to resolve the "exit" command.
Let's change the code a little to do a proper command that prints "Hello World!" and let's do it MVC style by creating a model:
public static class MyModel extends BasicDataModel {
   public void newData() {
      setData("Hello World!");
   }
}
There is no need to create a DataView as ConsoleApplication provides one for us called
ConsoleView to represent the command prompt. More on this later. Now our constructor looks like this:
ConsoleApplication application =
  new ConsoleApplication("HelloConsoleWorld", MyModel.class);
Creating a ConsoleCommand is simple, it's an Action class. All you do is implement
actionPerformed() and add it to the application using putCommand("command",
ConsoleCommand). Here we create and add a
ConsoleCommand with the command name "sayhello".
application.putCommand("sayhello", new ConsoleCommand() {
  public void actionPerformed(ActionEvent e) {
     getConsole().writeLine("Hello World!");
  }
});
Here is the total source for our "Hello World" console application:
public class HelloConsoleWorld {
   public static class MyModel extends BasicDataModel {
      public void newData() {
         setData("Hello World!");
      }
   }

   public static void main(String args) {
      ConsoleApplication application =
          new ConsoleApplication("HelloConsoleWorld", MyModel.class);
      application.putCommand("sayhello", new ConsoleCommand() {
        public void actionPerformed(ActionEvent e) {
           getConsole().writeLine("Hello World!");
        }
      });
      application.run(args);
   }
}
Here are the results:
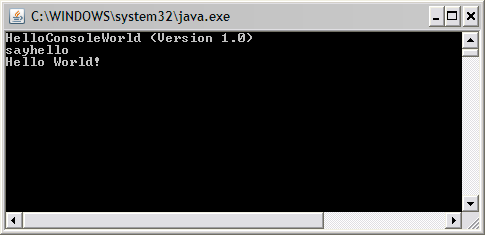
There is no need to create a
DataView, in one sense because our view is provided by the Java console, in another because
ConsoleApplication always provides a DataView implementation called
ConsoleView. This view is our proxy to the Java console. As can be seen in the previous example, we can write to this object to get information to the console. While console writing is trivial,
ConsoleView provides many beneficial features such as formatted writes using both
MessageFormat and our own UL-language based
ObjectFormat, as well as being able to write data as tables.
Tutorial 5: ConsoleFlowDemo.java
In this example we will dig more into how command flow operates in a
ConsoleApplication as well as introducing the powerful console input facilities of
ConsoleView.
As mentioned previously, if a command cannot be found, the
IdleCommand is executed. Hence, this command can be thought of as a safety net and as a
default command. You could replace the
IdleCommand (but not remove it), or better yet, set its prompt. This is a great way to implement a "menu" that will always show in the absence of another command, instead of an empty line. Since we are going to create a handful of comands in this example, let's use this convention:
ConsoleCommand idle = (ConsoleCommand)application.getActionMap().get(IdleCommand.KEY);
idle.setPrompt("Enter a command: ");
Reading and Writing To Console
ConsoleApplication automatically provides a DataView called
ConsoleView. As can be seen in the previous example, we can write to this object to get information to the console.
ConsoleView has many read and write methods. In fact, perhaps the most powerful feature in the console API are the blocking write methods. These methods write to the console and block until the user enters the correct data. By "block" we mean that the prompt repreats until the correct data is input. Consider this command:
application.putCommand("int", new ConsoleCommand("Enter an integer: ") {
  public void actionPerformed(ActionEvent e) {
     int n = getConsole().readInt();
     getConsole().writeLine("You entered " + n);
  }
});

Notice in this example we placed the prompt in the constructor of the
ConsoleCommand. This is an optional technique. You could just as easily prompt by writing to the
ConsoleView with one of the many write methods.
This command will block until an
int is input in the console. There are blocking reads for Strings and all the Java primitive types, and some special case character types. Here is one for a letter:
application.putCommand("letter", new ConsoleCommand("Enter a letter: ") {
  public void actionPerformed(ActionEvent e) {
     char n = getConsole().readLetter();
     getConsole().writeLine("You entered " + n);
  }
});
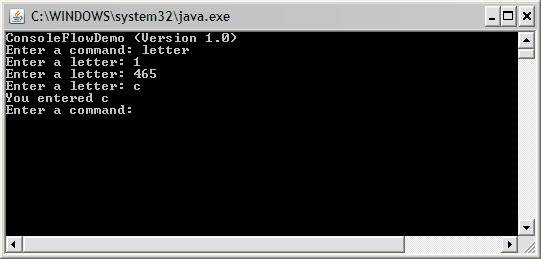
Objects can be parsed as well via ObjectConverters. Here we ask for a value that needs to resolve to a Point:
application.putCommand("point", new ConsoleCommand("Enter a Point (x,y): ") {
   public void actionPerformed(ActionEvent e) {
      Point p = (Point)getConsole().readObject(Point.class);
      getConsole().writeLine("You entered " + p);
   }
});
You can also facilitate your own custom blocking read using a
ConsoleInputValidator. Consider this command that necessitates a number between 1 - 5:
application.putCommand("range", new ConsoleCommand("Enter a Number (1 - 5): ") {
   public void actionPerformed(ActionEvent e) {
      CommandString s = getConsole().readInput(new ConsoleInputValidator() {
         public boolean validateInput(CommandString input) {
            if(input.validate(int.class, 0)) {
               int n = input.getInt(0);
               return n >= 1 && n <= 5;
            }
            else {
               return false;
            }
         }
      });

      getConsole().writeLine("You entered: {0}",
                 new Object[]{new Integer(s.getInt(0))});
   }
});

Here we use another Object in the ConsoleApplication API;
CommandString. This is a powerful command-line parser that simply wraps a String. It provides significant command-line validation and parsing capabilities. The
readInput() method returns the input String as a
CommandString. In this case, our custom validator made sure it was an int, then parsed the int to do the range check. Also notice the
writeLine() signature that accepts a MessageFormat pattern.
Control Flow
There are many ways to control flow in the console applicaton. For example, you can control program flow with the
readResponse() methods. These are blocking reads that facilitate command-line dialogs with the user and work with the same constants used with dialogs in the
GUIApplication. Here we will direct the user to different actions based on their response.
application.putCommand("choose", new ConsoleCommand() {
   public void actionPerformed(ActionEvent e) {
      int response = getConsole().readResponse("Do This?", YES_NO_DIALOG);
      if(response == RESPONSE_YES) {
         setNextCommand("this");
      }
      else {
         setNextCommand("that");
      }
   }
});

application.putCommand("this", new ConsoleCommand() {
   public void actionPerformed(ActionEvent e) {
      getConsole().writeLine("You did this");
   }
});

application.putCommand("that", new ConsoleCommand() {
   public void actionPerformed(ActionEvent e) {
      getConsole().writeLine("You did that");
   }
});
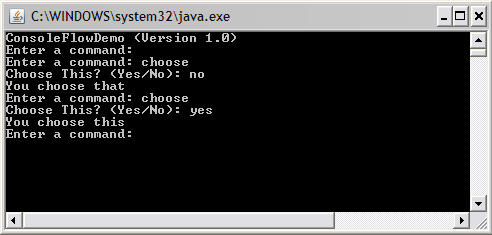
In this example we use a couple of flow control devices. First we used the blocking dialog response read via
readResponse(). Notice how it supplies the options. Also notice the forgiving interpretation of the response. "Yes" would have worked for "Y", "y" and "ok", too.
The other flow control device we use here, and more importantly, is the
setNextCommand() method. Remember that the ConsoleApplication is command-driven. A
ConsoleCommand will only execute once. The application will then look for another command to execute based on the input buffer. If a command cannot be found, the
IdleCommand is executed, as mentioned before. Therefore, as we have done in this example, you can move from command to command by calling
setNextCommand() to tell ConsoleApplication the next command to execute. You can also call
resetCommand() , which allows you to develop commands that bounce back to the caller, which could be a menu or submenu command.
Next Steps
As you can see, there is plently of convenience and power here in the
ConsoleApplication. We havn't reviewed the built-in commands that provide data management, help, and printing. Just try typing "help" to inspect these commands. There is plenty to explore. Here are some classes you may wish to review:
| Class/Interface |
Description |
| ApplicationLifecycleListener |
Listen to the application lifecycle |
| DataModelListener |
Listen to the data lifecycle |
| ConsoleViewListener |
Listen to the ConsoleView context switches |
| ConsoleCommand |
Implement to provide a command to the application |
| DelegatingCommand |
Use to execute command methods in another class to reduce class count |
| ExternalCommand |
Execute OS-specific processes |
| CommandInputValidator |
Create custom blocking-reads |
| ConsoleFilter |
Filter all i/o to/from the view |
| Resources |
Read and convert resource bundle values, bind resources to objects |
We're sure this API will get you going fast with that next command-line application.
Closing
We encourage you to download, experiment, or make an application yourself with the JIDE Desktop Application Framework. The Developer Guide is thorough and even includes a
migration guide if you have an "at risk" project and are looking for alternatives.
Minimum JDAF Requirements:
- jide-jdaf.jar
- jide-commons.jar (2.1.2+)
- jlfgr_1_0.jar (Java Look and Feel Graphics Repository. Used by the Cross Platform Application UI)
JSR-296 Compatibility
For those of you who are keeping an eye on the work being done by Hans Muller and the group on JSR-296, we currently provide a JSR-296 wrapper API that will allow you to you use both JSR-296 and JDAF.
|


